Stages of Making Digital Comics
Practices and software have dramatically evolved in 20+ years. InDesign makes production-level PDFs without Acrobat, nobody's bordering in Illustrator, and Quark XPress joined the obsolete software club with PageMaker and FreeHand. The once-industry standard Wacom Intuos got supplanted by Wacom Cintiq, which was made obsolete by Procreate on the iPad Pro.
Luckily this pages is fortified with current practices and examples. If your gagets and killer story are in place, let's begin:

Adobe Photoshop: The selection, resizing, layers and "soft pencil" tools are the closest things to my traditional drawing methods. Photoshop's pen tool is an excellent way to control perspective.
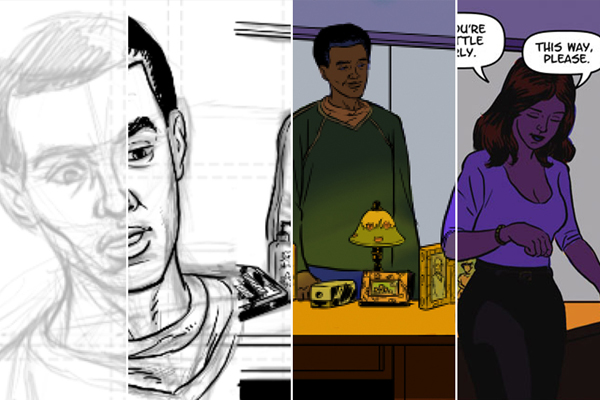
Work actual print size at 400ppi, export pencil art as a TIF for the inking phase. Account for lettering in the sketch phase.

Adobe Illustrator: I used to import borderless final pixel art of each page in Illustrator, masking it with compound paths for bordering and lettering. It seemed like a good idea at the time, but layering got complicated when wanting elements to pop outside of their panels. Bordering the art makes much more sense.
Letter-o-matic from Blambot was my first dialog font, but I've since moved onto ComicCraft's Samaritan. Please refer to Nate Piekos or Balloon Tales (led by Richard Starkings & John Roshell) for industry standard best practices.
Place the pencil art TIF in an Illustrator file, then create a new layer for lettering and sound effects. When you're happy, make an EPS file of your page.

Corel Painter: The anti-aliasing is "tighter" than Photoshop's, making a much cleaner ink stroke. The latest versions have terrific brush and texture controls. The page rotation tool's a life-saver! Inking happens quickly, brushing way outside the planned borders.
Import the pencil TIF from step one on a separate layer. Trace over it in "ink", Save As a TIF (with slightly different name to avoid overwriting your pencil TIF.)

Adobe Photoshop: Adobe Photoshop: Corel Painter was fantastic for my illustrations, but proved too complicated for comics. Years of using Photoshop's layer, opacity, masking, and color manipulation tools prevented me from using Painter, an alternative that virtually no one else was using.
After color flatting, modify flat areas of color with hue/saturation, levels, and custom pallets. These flat areas can be used as masks on separate layers for gradients and SFX.

Adobe InDesign: his is where comic book pages are collected, paginated, prepped for production, and integrated with non-comics pages (covers, advertising, letters pages, etc.) for print. In the old days, pages with art and lettering assets had to be saved as EPS files for pagination. InDesign has been able to import source Illustrator files for years now.
Design and create an InDesign file with the exact print dimensions, margins, print-specific elements (typography style, page numbering, etc), and layouts for comics and non-comics pages. Import your comics pages, and build the non-comics pages.
In Conclusion...
I hope this was helpful. Working completely digitally isn't the revolutionary technique it was when I started. If you've any tips or hints that would save a young cartoonist a few hours of grief, please share! The comics karma gods will bless you.
David Marshall, retro-posting from Inman Square.